- 浏览: 677697 次
- 性别:

- 来自: 合肥
-

文章分类
最新评论
-
di1984HIT:
学习了,学习了!
Tomcat的URL中文乱码解决以及传输优化 -
arottenapple:
...
我的二十一天CoreJava 学习笔记 -
黯淡流觞:
...
我的二十一天CoreJava 学习笔记 -
onlyOneToOne:
wsc830719 写道@RequestMapping(val ...
spring mvc3中 ResponseBody中文乱码 -
waj_615:
但是打印订单不是简单的string 啊
用java实现打印功能
dojo1.7翻译 Hello,World
- 博客分类:
- Dojo
原文地址:http://dojotoolkit.org/reference-guide/1.7/quickstart/helloworld.html#quickstart-helloworld
这篇文章是为那些dojo新手而写的。这里会尽可能的介绍一些dojo的内容,但不可能非常的详细,因为如果太详细就会使新手误解dojo是这些的复杂这么的难学,从而可能会吓退部分的初学者。如果想了解更多的内容,就去找专门的API或文章了。
所需要的环境
- 要有dojo.从dojotoolkit.org下载最新版的。
- 要有一个web服务器。dojo的很多功能要部署在服务器上才出展现
- 要有一门语言的容器ASP,PHP,JSP的都行。因为dojo的ajax功能需要这种客户端-服务端架构
- IE,firefox,opera,safar浏览器。。。
配置dojo
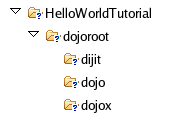
在web服务器里我们来创建一个文件夹,起名HelloWorldTutorial,在里面再创建一个子文件夹dojoroot,把dojo的下载文件解压后放到这个子文件夹下,最后效果如图
开始来dojo了
好了,我们开始来设计我们的html页面了。创建一个页面,使内容如下
<html>
<head>
  <title>Dojo: Hello World!</title>

  <!-- SECTION 1 -->
  <style type="text/css">
      @import "dojoroot/dijit/themes/tundra/tundra.css";
      @import "dojoroot/dojo/resources/dojo.css"
  </style>
  <script type="text/javascript" src="dojoroot/dojo/dojo.js"
    data-dojo-config="parseOnLoad: true"></script>
</head>

<body class="tundra">
</body>
</html>
从上面的代码中可以看出,这只是一个静态的页面,里面引入了两个css,一个dojo的js
创建一个铵钮控件
好,第一个令人兴奋的效果就要来了。现在我们要创建一个按钮的控件,他会给出鼠标不同操作的不同效果新体验。
第一步,要让dojo去加载一个合适的模块。在页面头中,我们加入新的代码。如下显示
<!-- SECTION 2 -->
<script type="text/javascript">
   // Load Dojo's code relating to the Button widget
   dojo.require("dijit.form.Button");
</script>
代码中的dojo.require就是去加载新按钮控件,如果没有这句代码就将不会有效果的.
第二步,在页面中加入以下代码
<button data-dojo-type="dijit.form.Button" id="helloButton">Hello World!</button>
在上面代码中,我们要注意的是data-dojo-type这个属性。这个属性就是用于通知dojo如何来操作当前的元素。上面的代码就是让dojo对当前元素进行dijit.form.button的相关处理.只要发现了data-dojo-type这处属性就会对其进行相应的操作
给控件加上事件
现在要给控件加上一个事件了,虽然我们可以给其加上一个onClick事件,但是我们还有另一种更有效的处理方法。就是加入dojo事件系统。
最简单的加入方法就是给按钮加入一个脚本标签。但不是任意的标签。这里的是dojo/method的脚本标签,参考以下代码
<button data-dojo-type="dijit.form.Button" id="helloButton">
    Hello World!
    <script type="dojo/method" data-dojo-event="onClick">
       alert('You pressed the button');
    </script>
</button>
简单吧。把脚本标签写在元素内部在某种意义上来说是有好处的。这样可以充分的使用二级事件。比如,对于能检测到是否在这个元素上进行了ctrl或shift等组合键的操作等等。如果你使用过这种二级事件处理的话,你将会知道,IE和Firefox是有不同的处理方式的。而对于dojo来说,处理的代码都是一样的。这是dojo很强的地方。
从服务器中读数据
点击按钮会弹出提示信息的效果已经做出来了。那现在来做个从服务器中取数据的效果。
dojo有一个简单的方法可以完成这个功能,使用dojo.xhrGet。
现在我们将从服务器中取文件response.txt这个文件中的内容。
第一步,我们要创建一个回调函数来处理从服务器读取到的数据。我们将它alert出来。加入以下语句
<script type="text/javascript">
     function helloCallback(data, ioArgs){
        alert(data);
     }
     function helloError(data, ioArgs){
        alert('Error when retrieving data from the server!');
     }
</script>
注意:这两个方法一个都不能少。第一个是处理成功返回的数据。第二个是绑定dojo的io功能的。
第二步,要把按钮的事件处理由提示固定信息更改成提示从服务器读取的信息。将脚本
<script type="dojo/method" data-dojo-event="onClick">
  alert('You pressed the button');
</script>
改成
<script type="dojo/method" data-dojo-event="onClick">
 dojo.xhrGet({
      url: 'response.txt',
      load: helloCallback,
      error: helloError
 });
</script>
上面的代码就完成这个功能了,它告诉dojo,使用url的方式去取服务器内容,用load的函数来处理取到的内容。如果访问出错,就用error函数来处理错误信息。
通过GET方法向服务器发送信息
现在我们使用GET方法向服务器发送信息,这在服务器里要有一个文件,起名为HelloWorldResponseGET.jsp文件
当然了,如果你用别的语言,那就可能是.asp .php .cfm等类型了
现在由于我们要发送信息,所以我们要加入一个输入框,把以前的代码
<button data-dojo-type="Button" widgetId="helloButton">
  <script type="dojo/method" data-dojo-event="onClick">
  dojo.xhrGet({
      url: 'response.txt',
      load: helloCallback,
      error: helloError
  });
  </script>
</button>
改成
<button data-dojo-type="dijit.form.Button" id="helloButton">
   Hello World!
   <script type="dojo/method" data-dojo-event="onClick">
   dojo.xhrGet({
      url: 'HelloWorldResponseGET.php',
      load: helloCallback,
      error: helloError,
      content: {name: dojo.byId('name').value }
   });
   </script>
</button>
Please enter your name: <input type="text" id="name" />
对于以上的url地址,要注意对应自己所选用的语言。
从上面的代码中我们可以发现,现在多个一个属性。content,这个属性可以含有合适的参数以传后服务器中,name就是后台服务器所要接的参数。如果后台服务器要接的参数是myName,则代码就要改成
content: {myName: dojo.byId('name').value }
dojo.byId这个方法我们还没介绍,他的功能就是相当于document.getElementById的功能
好了,功能完成了,你输入信息再点击按钮后就会返回信息Hello <name>, welcome to the world of Dojo!, 其中name就是你所输入的内容
相应的服务器端文件内容是
PHP服务器
<?php
/*
* HelloWorldResponseGET.php
* --------
*
* Print the name that is passed in the
* 'name' $_GET parameter in a sentence
*/

header('Content-type: text/plain');
print "Hello {$_GET['name']}, welcome to the world of Dojo!\n";
?>
ASP服务器
<%
'
' HelloWorldResponseGET.asp
' --------
'
' Print the name that is passed in the
' 'name' GET parameter in a sentence


response.ContentType="text/plain"
response.write("Hello " & request.querystring("name") & ", welcome to the world of Dojo!\n")
%>
COLDFUSION服务器
<!---
/*
* HelloWorldResponseGET.cfm
* --------
*
* Print the name that is passed in the
* 'name' GET parameter in a sentence
*/
--->
<cfsetting showDebugOutput="No">
Hello, #url.name#, welcome to the world of Dojo!
</cfsetting>
JAVA服务器
<%
/*
' HelloWorldResponseGET.jsp
' --------
'
' Print the name that is passed in the
' 'name' GET parameter in a sentence
*/

response.setContentType("text/plain");
%>
Hello <%= request.getParameter("name") %> , welcome to the world of Dojo!
PERL服务器
#!/usr/bin/perl
#
#  ' HelloWorldResponseGET.pl
#  ' --------
#  '
#  ' Print the name that is passed in the
#  ' 'name' GET parameter in a sentence
#
use strict;
use CGI;
my $cgi = CGI::new();
print $cgi->header(-type => "text/html; charset=utf-8");
print "Hello " . $cgi->param('name') . ", welcome to the world of Dojo!\n";
使用POST方式提交内容到服务器中
要改成POST方式提交非常的简单,稍微改下方法就行了。
第一步,加入form元素
把代码
Please enter your name: <input type="text" id="name" />
改成
<form id="myForm" method="POST">
  Please enter your name: <input type="text" name="name" />
</form>
第二步,把方法
<script type="dojo/method" data-dojo-event="onClick">
      dojo.xhrGet({
         url: 'HelloWorldResponseGET.php',
         load: helloCallback,
         error: helloError,
         content: {name: dojo.byId('name').value }
      });
</script>
改成
<script type="dojo/method" data-dojo-event="onClick">
 // Don't forget to replace the value for 'url' with
 // the value of appropriate file for your server
 // (i.e. 'HelloWorldResponsePOST.asp') for an ASP server
  dojo.xhrPost({
      url: 'HelloWorldResponsePOST.php',
      load: helloCallback,
      error: helloError,
      form: 'myForm'
 });
</script>
从上面代码可以看出来,我们改了一下方法名,把xhrGET改成了xhrPost,把content属性删除了。加入了表单元素。
再就是改下服务器中的处理文件了,这个和GET方法中的处理差不多,就是把取GET的改成取POST的。
具体服务器文件实现方式略去。


发表评论

-
dojo封装dialog提示框
2012-06-20 10:20 5578/** * 显示dojo的弹出框.前提是已经引用了相 ... -
dojo封装表单ajax提交
2012-06-20 10:16 1676/** * dojo的ajax提交form(post ... -
封装创建dojo的dialog
2012-06-18 13:55 0/** * 显示dojo的弹出框.前提是已经引用了相 ... -
自定义封装dojo通用ajax提交表单
2012-06-18 13:52 2609/** * dojo的ajax提交form(post ... -
使用dojo的dialog自定义confirm效果
2012-06-18 13:43 5064/** * 使用dojo dialog模拟confi ... -
dojo 制做非模态窗口dialog
2012-06-16 13:27 4289dojo的dialog效果基本上都是模态的,也就是说,在弹出窗 ... -
dojo1.7的加载方法
2012-06-01 17:16 4234对于dojo1.7来说,最大的变化就是引入了AMD异步加载器。 ... -
不翻译DOJO了
2012-05-16 17:57 1075翻译DOJO的时间并不长。总是感觉把老外的话翻译过来很是生硬, ... -
dojo1.7翻译 数组工具(Arrays Made Easy)
2012-05-14 10:55 1869英文地址:http://dojotoolkit.org/ ... -
dojo1.7翻译 Dijit的主题,按钮和文本框(Dijit Themes, Buttons, and Textboxes)
2012-05-03 15:52 2154原文地址:http://dojotoolkit.org/ ... -
dojo1.7翻译 动画效果(Animations)
2012-05-02 12:08 2723原文地址:http://dojotoolk ... -
dojo1.7翻译 动态效果(Dojo Effects)
2012-04-27 10:15 1283原文地址:http://dojotoolkit.org/doc ... -
dojo1.7翻译 处理DOM(Dojo DOM Functions)
2012-04-26 15:51 2479原文地址:http://dojotoolkit.org/doc ... -
dojo1.7翻译 ajax跨域请求(Getting Jiggy with JSONP)
2012-04-25 12:02 3127原文地址:http://dojotoolk ... -
dojo1.7翻译 ajax功能(Ajax with Dojo)
2012-04-24 15:04 1539原文地址:http://dojotoolk ... -
dojo1.7翻译 搜索节点功能(Using dojo/query)
2012-04-23 15:32 1838原文地址:http://dojotoolkit.org/doc ... -
dojo1.7翻译 hello,dojo
2012-04-22 15:21 2104原文地址:http://dojotoolkit.org/doc ... -
dojo1.7翻译 定义类(Classy JavaScript with dojo/_base/declare)
2012-04-20 15:34 2500原文地址:http://dojotoolkit.org/doc ... -
dojo1.7翻译 定义模块(Defining Modules)
2012-04-18 17:21 6774原文地址:http://dojotoolkit ... -
dojo1.7翻译 通过dojoConfig来配置dojo
2012-04-18 09:20 5156原文地址:http://dojotoolk ...
相关推荐
Dojo1.7 Api chm 英文版
Dojo 1.7 中文版本注释功能说明,以Dojo使用案例,很经典,做为系统了解Dojo功能及用法很有用!
Dojo 1.7 版本注释 非常全面 收集了很就在这里和大家共享。共同学习。
最新dojo包,内含最新的实例若干个。是入门学习的好帮手!
dojo 源码1.7汇总 包括dijit 和 dojo 打包汇总 非常好的
dojo服务器推送技术的HelloWorld例子 自己查了网上的资料写出来的HelloWorld的例子 自己是个菜鸟 写的不好 希望大家能和我交流
Dojo 1.1.1 提供了上百个包,这些包分别放入三个一级命名空间:Dojo,Dijit和 DojoX 。其中 Dojo 是核心功能包 , Dijit 中存放的是 Dojo 所有的Widget 组件,而 DojoX 则是一些扩展或试验功能,DojoX 中的试验功能在...
dojo dojo实例 dojo例子 dojo资料 dojo项目 dojo实战 dojo模块 dojo编程
源码 博文链接:https://j2ee-zhongqi.iteye.com/blog/899082
一、 Dojo学习笔记(1. 模块与包) 1 二、 Dojo学习笔记(2. djConfig解说) 4 三、 Dojo学习笔记(3. Dojo的基础对象和方法) 6 四、 Dojo学习笔记(4. dojo.string & dojo.lang) 9 五、 Dojo学习笔记(5. dojo.lang.array ...
示例Java应用Docker和Kubernetes dojos 将HELLO_ENV环境变量设置为任何值,以设置8080端口上显示的消息。 默认值为“默认”。
dojo文档 dojo文档 dojo文档 dojo文档 dojo文档 dojo文档 dojo文档 dojo文档 dojo文档 dojo文档 dojo文档 dojo文档
dojoDemo 包括多个dojo方法的用法,HelloWorld等示例,学习Dojo不错的资料(Demo)
Dojo官方教程中文翻译(完整版),欢迎大家下载参考。
dojo js dojo js dojo js dojo js dojo js dojo js dojo js
Dojo是一个非常强大的、面向对象的、开源的JavaScript工具箱,它为开发富客户端Ajax应用提供了一套完整的小部件和一些特效操作。曾经有人这样说:“对于一个Web开发者而言,如果没有Dojo,他将是一个“残废”的...
Dojo是基于JavaScript开发的,用来作为WebGis API For JavaScript开发的框架使用,本文档是官方教程的中文翻译,值得收藏和拥有!
DOJO中文手册【出自dojo中国】 页数60+ 简单介绍: Dojo 是一个用javascript语言实现的开源DHTML工具包。它是在几个项目捐助基础上建立起来的(nWidgets, Burstlib, f(m)), 这也是为什么叫它a \"unified\" toolkit的...
dojo.js.核心jsDojo.js核心dojo的javaScript类库Dojo.js核心dojo的javaScript类库Dojo.js核心dojo的javaScript类库Dojo.js核心dojo的javaScript类库
学习dojo的绝好资源学习dojo的绝好资源学习dojo的绝好资源学习dojo的绝好资源学习dojo的绝好资源学习dojo的绝好资源学习dojo的绝好资源学习dojo的绝好资源学习dojo的绝好资源学习dojo的绝好资源学习dojo的绝好资源...